As a guitar player, I’ve focused most of my efforts on my fretting hand leaving the picking hand to learn on its own; my right hand is fully autodidact. I don’t remember doing any exercises to increase its dynamics after my initial 2 or 3 years of playing, and that was over 20 years ago.
Recently, though, I found myself in the need to add nuances to my playing without any electronic devices to help. So, my attention went back to my picking hand and that’s when I discovered a new universe. Furthermore, I unleashed a whole new realm of tones I didn’t know was, literally, at my fingertips.
I think learning to use my fingers as well as my pick made me a better player and I want to share that experience with you. Believe me, there’s a whole new world to discover and a new set of skills and sounds waiting to be added to your catalog of moves.
Let’s do this!
Table of Contents
Why Should You Learn Multiple Picking Techniques?
Let me answer the question above with an anecdote. I had to learn multiple picking techniques to put some food in my belly, so it was kind of a do-or-die thing. Not to spoil the story, but it made me a much better player.
Last year, we took off with my girlfriend on a trip around the beautiful Caribbean beaches in Central America without much more than a couple of laptops, a Baby Taylor, and her beautiful singing voice. While we were playing dining rooms and small beach shacks, I had to learn how to give my playing enough dynamics to keep people entertained with nothing but my picking style.
At first, tunes like “Suzanne” by Leonard Cohen were quite a bumming 4-minute-of-boredom thing people would yawn at. Nevertheless, I’m never giving up on myself, so I decided to up my game by incorporating some new, exciting strumming and picking techniques to keep it interesting.
As a result, I was able to learn to switch between fingerpicking, hybrid picking, and using a pick as if they were clean, overdrive, and distortion. Moreover, I was able to join her in the nuances she gave her singing and we became this two-person orchestra that would keep tourists enjoying their meals and moving their heads along with our cool rhythm.
Let me share with you what I’ve learned while on the sandy beaches and beautiful landscapes of the amazing Central American Caribbean.
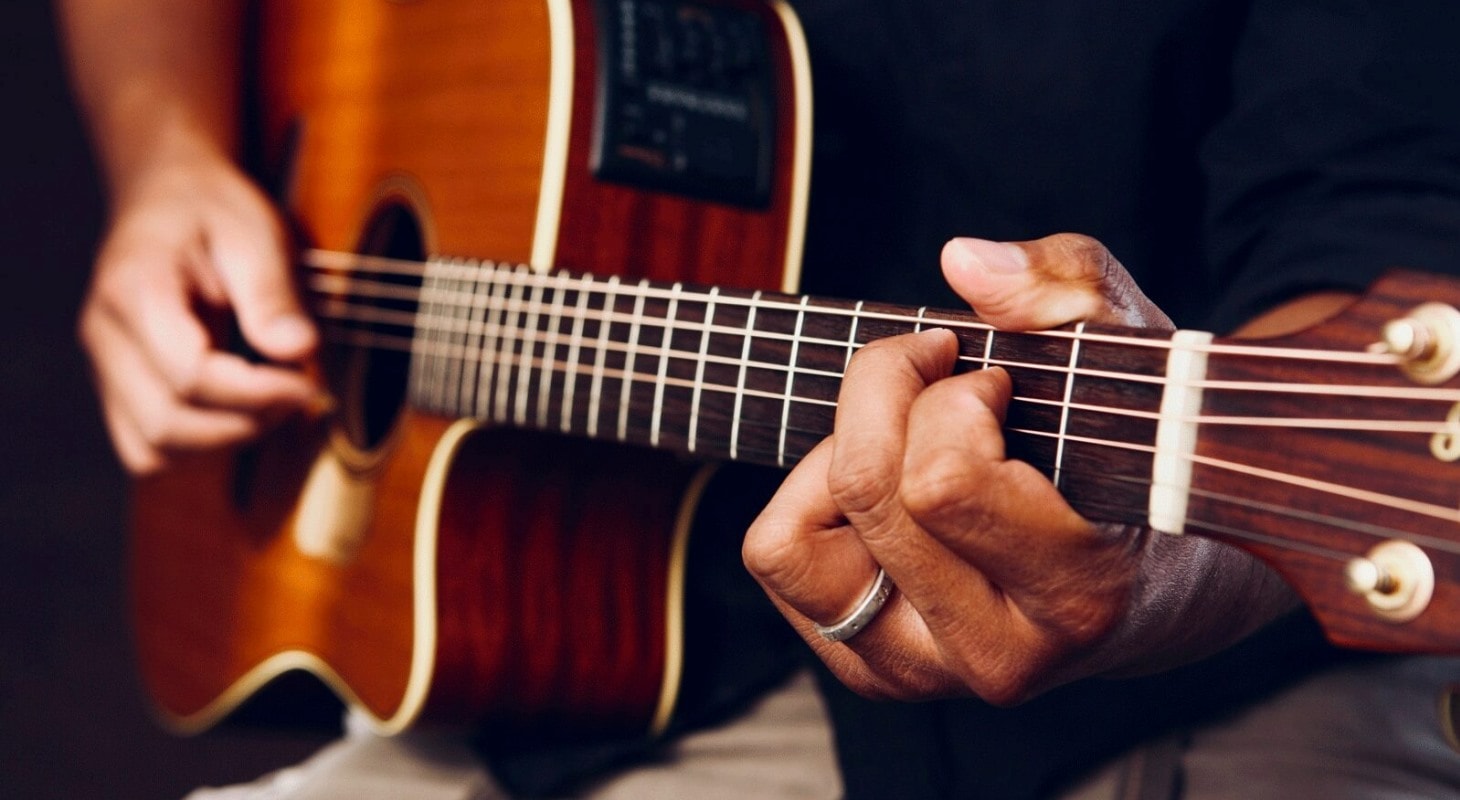
Fingerpicking, Multiple Attacks & a Softer Tone
Fingerpicking is a technique that allows you to use all the fingers on your picking hand to create different textures. Moreover, it allows you to go further than using a pick because you can play multiple strings at the same time, creating a unison effect.
Although this might seem as something odd or very difficult, you just have to train the brain. Believe me, in no time, you’ll be doing it without even thinking about it.
But let’s not go so much ahead of us and start slow and from the beginning.
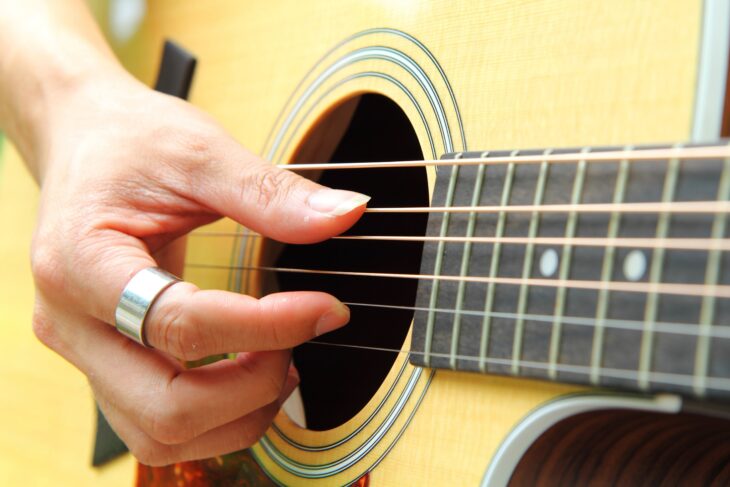
Nails or Fingertips?
The first thing people tell me when we speak about fingerpicking is “I don’t want to have long nails just to play guitar.” I know, aesthetically, it isn’t the best thing and long nails do need a lot of care and attention.
But beyond the purely pragmatic and aesthetic thing, there’s a sound difference between the nails and the fingertips. Indeed, playing with your bare fingers makes your guitar strings sound mellow. The melodic lines and soft arpeggios feel more intimate and, especially with bronze strings, you get more warmth out of your instrument.
My recommendation or, better said, my personal approach, is going for the bare skin of the fingers to stay as far away from the picking sound as I can. This allows me to have further dynamics in my playing.
Travis Picking
Travis picking is a technique named after Merle Travis, a legendary singer-songwriter who played country music. But what is Travis picking? Well, it is a technique that allows you to play a bass line and a melodic line at the same time. The thumb will take care of the low notes while the other fingers take care of the higher strings.
A good way of thinking about it is this: the thumb is for the wound strings while the plain strings are played with your index, middle, and ring finger. If you want to extend the scope of action, you include the pinky.
But, how do you play using this technique? Well, if you have ever seen someone like Johnny Cash play live, you can see Travis picking in action. There’s a syncopated rhythm forming between the thumb and the rest of the hand.
Let’s Work on It!
Let’s do two very simple exercises that will get you playing with Travis picking and also doing things you can’t do with a pick.
Before we start, make sure you’re always playing these exercises to a metronome. Remember, we’re working on the picking hand, so this is, basically, a rhythmic exercise.
Exercise 1
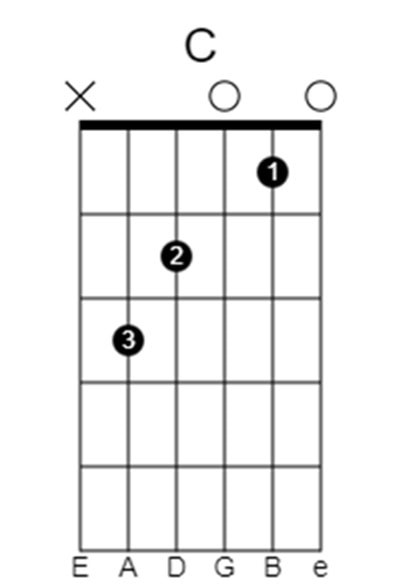
Let’s get started with an exercise that is very simple utilizing two chords I’m sure you know really well: C and G. In case you don’t know them, I’ll leave the diagrams here too.
The initial idea is that you play the low C on the 5th string with your thumb and the high C and E notes with either your index or your middle finger. You can also play it with the ring fingers if that feels more comfortable for you.
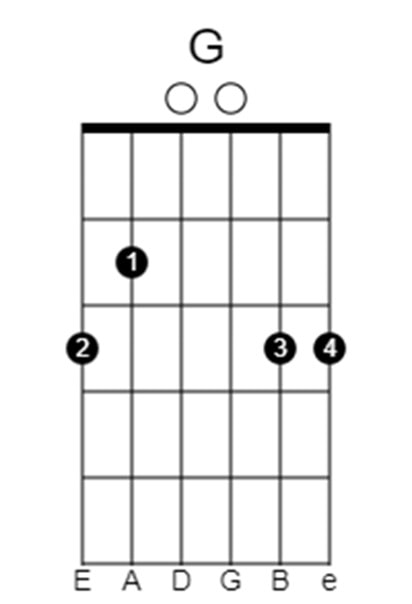
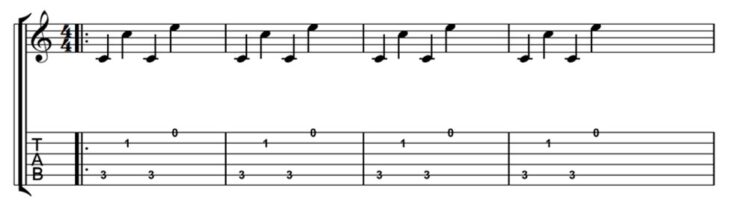
Secondly, let’s move on to a different chord, the G chord. Again, your thumb will play the low G and B while your other fingers will take care of the high G and D.
Now, for the final part of the exercise, you have to alternate the same strings and notes but in a different order.
PRO TIP: This exercise is based entirely on accuracy and not on speed. Don’t try to go faster, just try to nail every note with the correct finger at the correct time. Once you can do it perfectly at a slow tempo, then you can start to speed up until you reach your desired speed.
Exercise 2
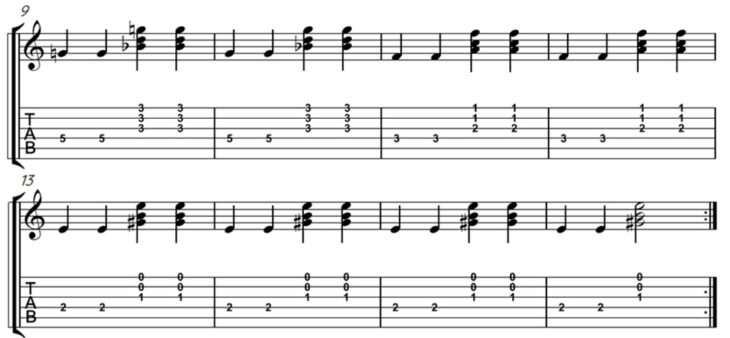
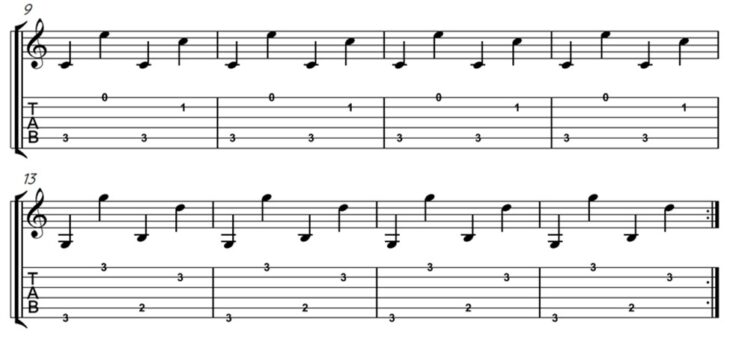
In this exercise, you’re going to practice using fingerpicking to do things you can’t do with a pick. For example, playing multiple strings in unison. Again, remember we’re practicing for a perfect rhythm, not going for speed; just accuracy.
You’re going to use just three chords you might be familiar with, Gm, F, and E. The shape I’ll give you in the chart might not be the one you’re used to, but it’s a great alternative and will be good for this practice.
Remember, the thumb is for the 4th string, and the rest of the fingers should be used to play the first three strings.
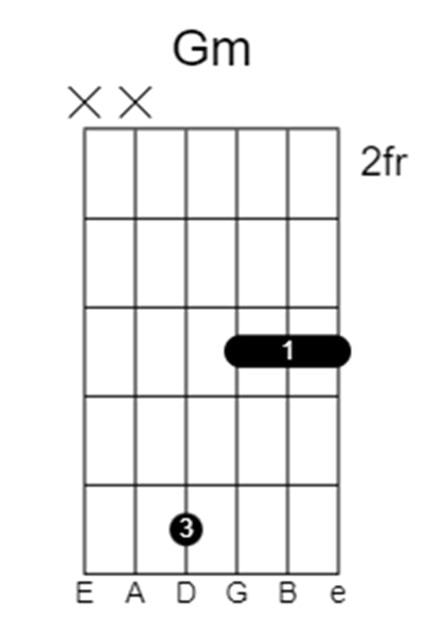
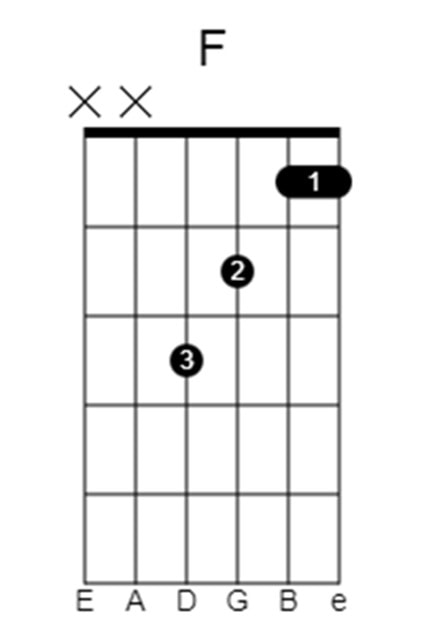
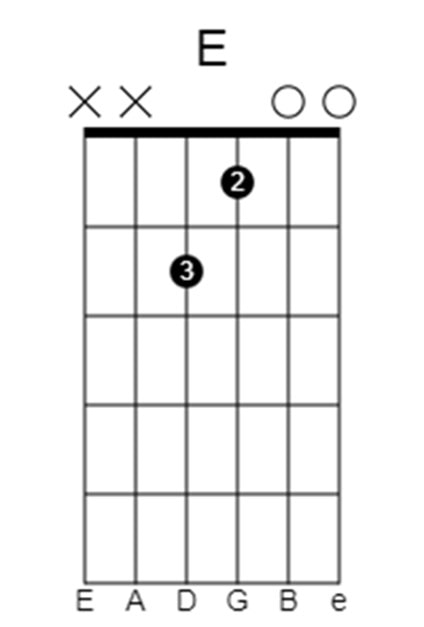
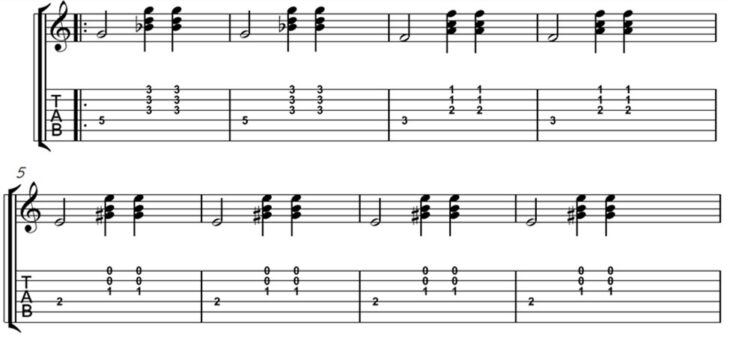
Now that you have this first part down, you’ll have to use the thumb twice in the same direction and then you’ll have to play the bottom strings twice as well.

Always play this exercise with a metronome and build up your speed slowly. Let me emphasize this: slowly and accurately is much better than fast and sloppy.
Picking, the All-Out Approach
Fingerpicking is the mellowest approach when strumming the guitar. Moreover, if you don’t have long nails or fake ones, you’ll be playing the strings with the skin of your fingertips. This gives them warmth and generates a cozy atmosphere that allows sweet phrasing to blossom.
Well, going back to the initial anecdote, when I moved from the fingertips to the almighty pick, it was my ethereal distortion pedal to bring everything up a notch.
So, I’m going to go through some of the things that I learned during those Caribbean days moving back and forth from fingers to pick and to a combination of both. So, go grab your favorite plectrum, and let’s go for it.
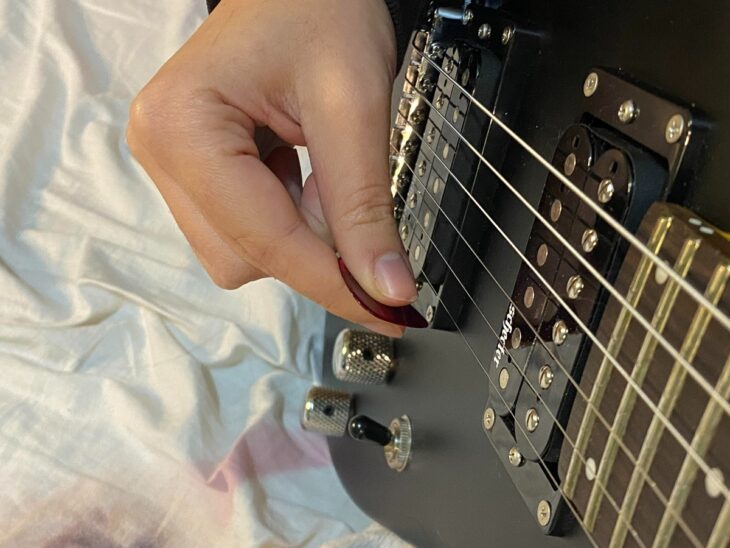
How to Hold the Pick?
Holding the pick the right way will give your playing more of a moving effect, you’ll play with a loose wrist and that helps your strumming a lot. Moreover, you won’t have to go through that embarrassing moment of going down on all fours trying to get the pick you just dropped in the middle of the show.
So, here’s my pick-holding technique.
- Extend your index finger and then make the tip touch the skin in your palm.
- Place the pick over the last phalanx of the finger before the nail. The pick’s pointy side should be facing down, opposite to your palm.
- Place your thumb on top of the pick completely parallel to your hand’s palm.
- Adjust the index finger to where it is comfortable. Maybe you’re like me and need to separate the tip of the finger some centimeters away from the hand’s palm.
Following these steps might seem like a lot of work to be done every time you sit down to play. Nevertheless, once you form the muscle memory, your brain will do it for you, so it’s just the initial effort.
Different Picks for Different Strumming Styles
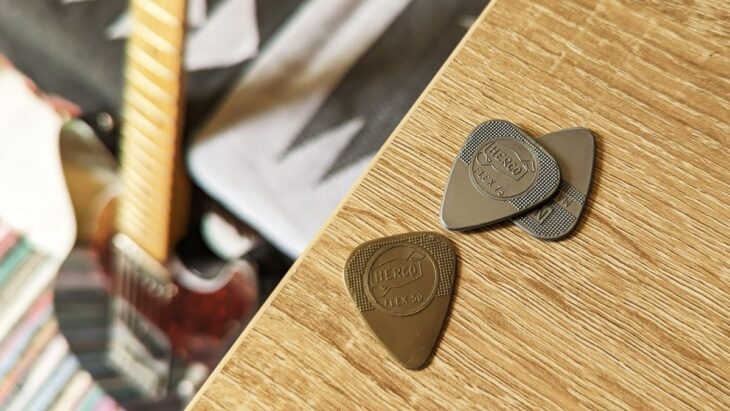
Before we move on to the playing exercises, I need to address one more thing: the type of pick and the strumming pattern have to be congruent. This means you should have at least a couple of picks to make your life easier.
- If you’re going to be strumming a lot, you need a thin or medium pick to hit the strings lightly and allow your arm to have a more fluid movement. Therefore, for heavy strumming, I recommend 0,50 and 0,70mm picks.
- If you’re going to be strumming but also arpeggiating, you need a pick that’s a little harder. Otherwise, you might just break it or have to press much harder to make it sound right. By doing that, you’ll lose speed and accuracy. So, for this scenario, I recommend medium to hard picks between 0,70mm and 1mm.
- If you’re going to be playing leads, power chords, and doing some heavy riffing, especially if you use thick strings, you need a stiffer pick. You can go for something super hard like a 3mm pick but I recommend using a 1 and 1.5mm picks for the whole thing. That’s the perfect intermediate thickness for a do-it-all approach.
Now that you have the tools for the trade-down, let’s put them to work.
Let’s Work on It!
You’ll find below three exercises that will help you practice three important aspects of picking. These will be strumming and arpeggios.
Don’t worry, the exercises are very simple, but the important thing about them is to nail the tempo and the accuracy perfectly. Then, you can start making it more complex for your fretting hand and have even more fun.
Exercise 1
For exercise 1, you’ll have to play multiple strumming patterns over a very simple set of chords. Please, pay close attention to the picking direction since this will be the turning point to make the connection between the wrist and the brain. Once you play it enough, it will become effortless, believe me.
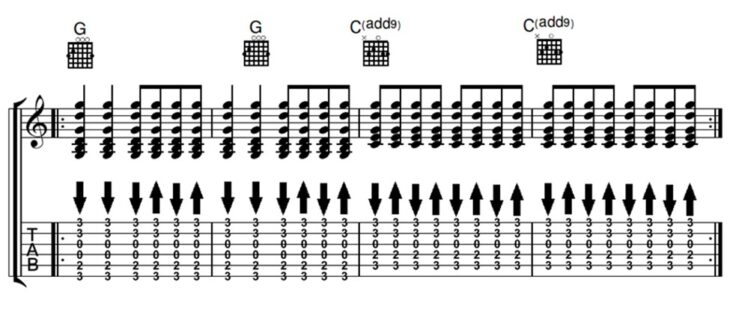
Now that you have that simple pattern down, let’s add another more relaxed strumming style so you can also practice the ringing of the strings and your picking accuracy with different figures.
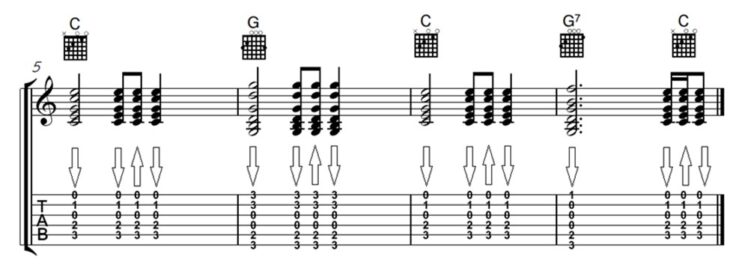
Exercise 2
Now that strumming patterns are on their way to mastery, it’s time to practice some arpeggios. As you might know, arpeggios played with a pick convey a certain movement to the song. Moreover, since there’s no fingerpicked warmth, you get a more aggressive sound that’s great for keeping people’s feet tapping on the floor.
Let’s get to it.
Remember, this is a picking exercise, so beyond getting every note perfectly right, it’s important that you pick them precisely at their right tempo and follow the proposed up-and-down technique.
Believe me, once muscle memory is going, nothing is stopping you from being an arpeggio master with the pick.
Exercise 3
For this final exercise, you’ll have to combine arpeggio and strumming in a very simple piece.
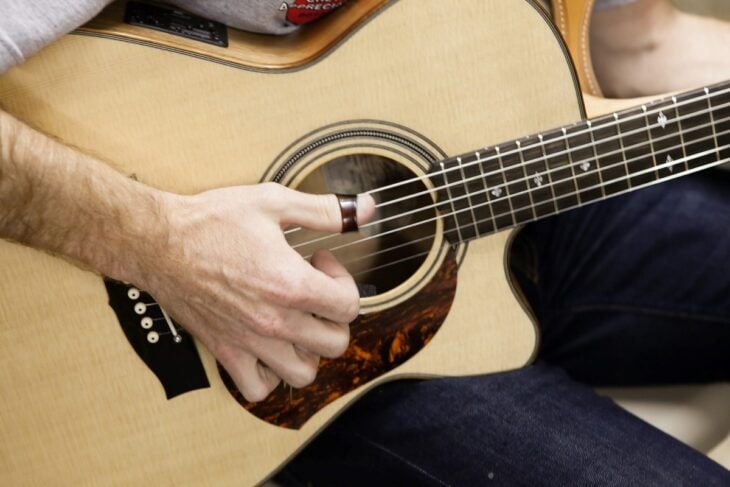
Hybrid Picking, The Secret Recipe
OK, so, I showed you how to play the clean and the distortion (figuratively, of course). Now, it’s time to check out a new technique that mixes the two above: hybrid picking.
I know what you might be wondering: “What’s the use of hybrid picking?” Well, to me, the most important aspect of hybrid picking is that it allows the player to add accents to the playing more easily.
I think the greatest example of this technique is the song “Neon” by John Mayer. He starts the song by using his thumb as a bass player slapping the instrument. I mean, he’s trying to go full-on Flea style on an acoustic. That’s not at all something easy to do.
But why does he do it? Well, to emphasize the accent on the bass line (AKA, the lower notes). That’s something you can easily do by using a pick for the first three strings (the wound ones) and your fingers for the remaining three.
By now, I’m sure you have the idea, hybrid picking is all about using the pick and the fingers at the same time. Moreover, you can use them alternately like the second “Neon” example, or you can simply play the lower strings with the pick while you play multiple strings in unison with your remaining fingers. Yes, just like you practiced above, but with a pick instead of your thumb.
Believe me, it makes a world of difference.
Why I Don’t Like Thumb Picks
Hybrid picking is a substitution for thumb picks. The reason I don’t like thumb picks is that you can’t lose them on the fly to go into full fingerpicking mode in a heartbeat. Therefore, in my opinion, they make you lose dynamics and reduce your possibility of going from mellow to full-on strumming in the same song.
When you’re playing with a pick, on the other hand, you can teach yourself how to hide it between your fingers. My technique for doing that works the following way:
- Moving the pick with your thumb, raise the index finger.
- Push the pick until it touches the middle finger.
- Close the index finger and leave the pick between the index and middle fingers.
Don’t worry if it sounds super hard, you’ll see that muscle memory does wonders with that, and before you know it, you’ll be hiding your pick without even thinking about it. Moreover, you can come up with your own version of it.
The Trick is to Soften Pick Attack
Before we get to the technique itself, let me tell you one of the most common pitfalls I had to learn to avoid is the volume difference. What do I mean? Well, the pick has a much louder attack than the skin in your fingers. Therefore, you have to learn to even that difference out if you don’t want it to be so big.
Most people, me included, try to play harder with the fingers to make those strings louder. Well, let me tell you that it’s a recipe for disaster. Instead, what you need to do is to close the gap by softening the pick attack. That way, all strings will be more even, but you’ll have the pick sound on the lower strings anyway.
Some Legendary Examples
Before we get to the exercises on this picking style, let me show you the way one of the greatest players to ever hold a Telecaster did it. His name is Danny Gatton, and if you haven’t heard of him, I urge you to go look for his live videos on YouTube.
Please, pay close attention to how he keeps a steady beat that drives the band with the pick and adds some notes to form chords with his three remaining fingers. In this scenario, hybrid picking works in two different ways:
- Keeping the down-picking rhythm that drives the band with a rocking/bluesy pick attack sound.
- Playing three notes at the same time without moving his hand at all, effortlessly transforming a bass line into a full chord.
Before you think that hybrid picking is only for acoustic guitarists and blues legends, here’s the great Kiko Loureiro showing you why he does hybrid picking all the time to play thrash metal.
Let’s Work on It!
Let me give you three exercises to play hybrid picking. The first two are strictly about hybrid picking but the last one will be a great opportunity for you to practice all we’ve seen and also learn a cool new riff, courtesy of yours truly.
Remember, in these exercises, you should avoid using your thumb, they are designed specifically for hybrid picking. So, every low note (like the low A tonic or low C tonic) should be played using your pick in a downstroke. The higher notes, whether in unison or as a sequence, should be played using your fingers only.
Let’s do this!
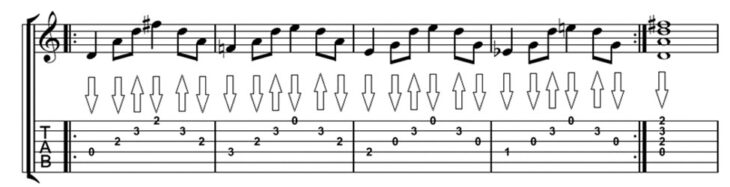
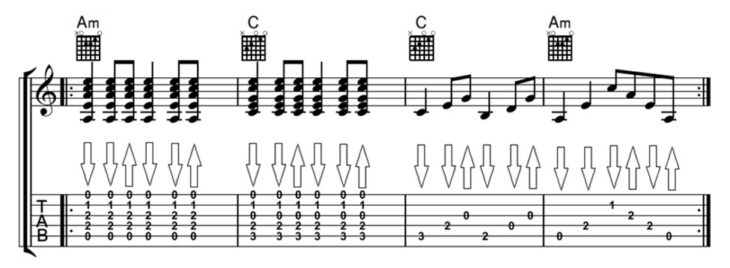
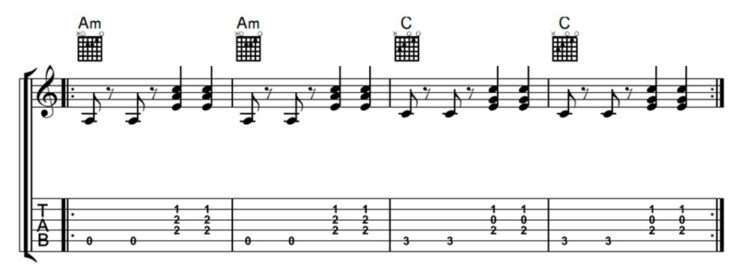
Exercise 1
Let me give you a very simple exercise so you can start using the pick and the fingers without much problem. You’ll pivot between an A minor and a C major chord playing the tonic with the pick and the rest of the chord with your fingers.
This is something you can’t do by playing just with the pick and that would sound much mellower when played only with your fingers. So, focus on getting the tempo and figures right, and then, I’ll move on to adding more movement and fun to it.
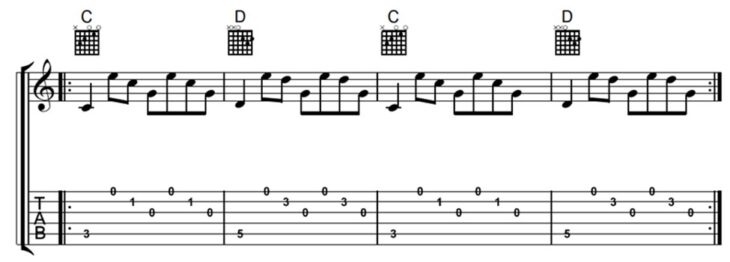
Exercise 2
In the last exercise, you practiced playing the tonic with the pick and then all the strings in unison to give it that happy-sounding, pulled-string sound. For this exercise, you’re going to arpeggiate the notes and play two chords, a C major and a version of a Dadd4add9. Don’t worry, it’s got the name of a hard chord, but it’s just moving the C structure two frets up.
Focus on the sequence you’re playing with your fingertips in eighth notes and practice it with a metronome. Once you have the sequence and can play it perfectly to a tempo, speed it up.
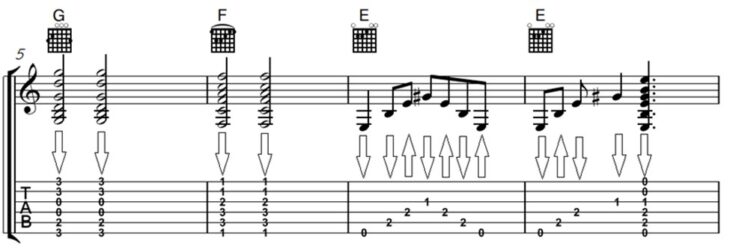
Exercise 3
This exercise is about alternating between hybrid picking, fingerpicking, and strumming. Don’t freak out, it’s very easy; let me break it down for you.
The first four bars and their repetition require hybrid picking for the low strings and pulling with your fingers for the high strings. After that, you should use your fingers to play the double stops that are in the A major pentatonic.
Finally, play the last A5 chord with a pick to make it sound rocking, big, and full.

The Bottom End
Now that you know three new ways to strum and play your guitar with and without your pick, it’s time to work on those different styles to make them part of your playing. I just showed you the entrance door to the kingdom of rhythm guitar; the path is yours to walk.
Make the most out of the different styles you just learned and come up with the combinations that work for you and your music. The only limit is your imagination.
Happy (hybrid picking) playing!